|
|
Happy Mail--Credit Card Swipe Technique: Backgrounds
|
I made these backgrounds for Jan’s Happy Mail Swap Challenge. I used the Credit Card Technique as described by Karen Dunbrook.
Supplies:
Neenah Classic Crest Solar White 110-lb. cardstock (backgrounds in the corners)
Specialty Stamping Paper (background in the center)
Distress Oxide Inks
Golden Fluid Acrylics, Titanium White
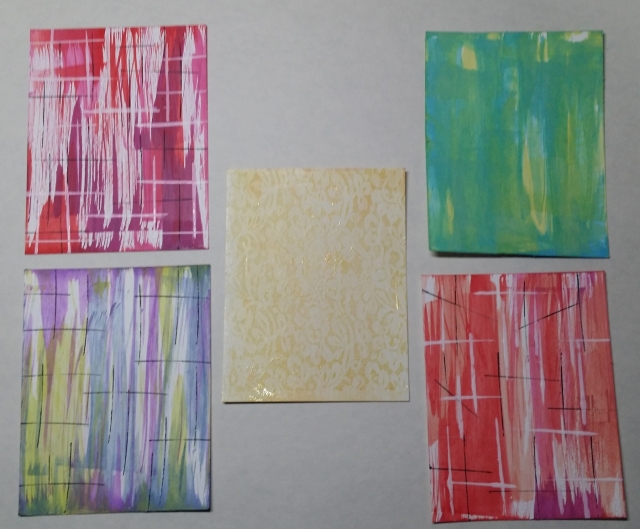
Colors, going clockwise:
Background #1
Candied Apple, Picked Raspberry, and Seedless Preserves
I used Black Soot to make lines. I also used Golden Fluid Acrylics, Titanium White, to make lines.
Background #2
Twisted Citron, Cracked Pistachio, and Peacock Feathers
This was the first one I made, and the ink spread a lot more than I had anticipated. I ended up with the cardstock completely covered with ink. It doesn’t even resemble the backgrounds that Karen (and everyone else) made.
Background #3
Twisted Citron, Wilted Violet, and Faded Jeans.
I used Black Soot for the lines. I did not make any white lines on this one. This is the one I chose to make into a card for the Happy Mail Swap.
Background #4
Candied Apple, Picked Raspberry, Seedless Preserves, Fired Brick
I was surprised that the Fired Brick turned out to be a melon color.
I used Black Soot to make lines. I also used Golden Fluid Acrylics, Titanium White, to make lines.
Background #5 ( in the center)
Wild Honey, Spiced Marmalade, Fossilized Amber
For this one, I tried using Specialty Stamping Paper. It is very slick so I wondered if the Distress Oxide Ink would dry on it. Another participant had used glossy card stock, and the ink did not dry (because it is partially a pigment ink), but it did leave behind color when she wiped it off. With the Specialty Stamping Paper, the colors all blended together instantly. I could barely make out the separate colors. It didn’t dry either. Before wiping the ink off the paper, I stamped one of Stampin’ Up’s Lacey backgrounds with Versmark ink and heat embossed it with clear detail embossing powder. When it was too late to turn back, I realized that the wet Distress Oxide ink would also pick up the embossing powder, but it did not. I have no idea why it didn’t, but the only thing that embossed was the stamped pattern. After that, I wiped down the paper to remove the excess Distress Oxide ink so that the embossed lacy pattern would show up darker. That worked. Like background #3, this background did not turn out the way a Credit Card Swipe Technique background should. It was a fun experiment, and I can still use the background. (I know. I could get the same look without half the effort by just using the emboss resist technique.
TFL.
Daria
ETA: Tim Holtz, Jennifer McGuire and others have posted videos about using Distress Oxide Inks on glossy cardstock. They used a heat gun to dry between applications of ink and then set it with Distress Glaze to make it permanent. The results were beautiful.
|
|