Artsy Inkers

Gallery for Stamping Forum


Home Contact Register Login
Forum Album list Last uploads Last comments Most viewed Top rated My Favorites By date Search
Home > Projects > Cards > Christmas Cards All Year 2018

Simon Says Stamp Peyton Ornament

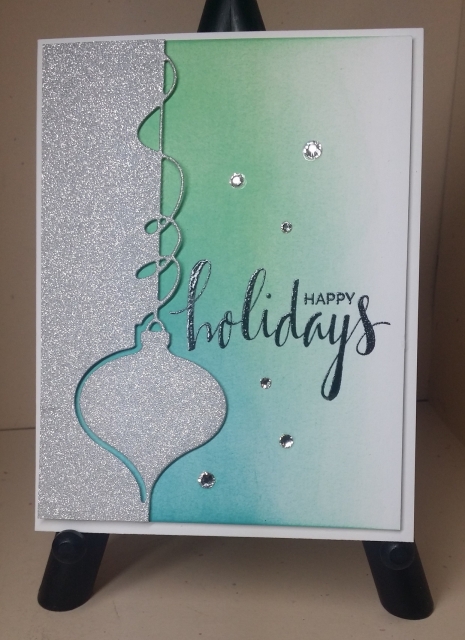
I made six cards. I tried to CASE Laura Bassen's beautiful card, but I had a very hard time getting my sponged background to look right so I switched to Clarity Brushes. It took longer to build up the color, but I was happier with my results. (I need to practice my sponging techniques!) Laura’s card: https://laurafadora.wordpress.com/2016/10/21/believe-in-the-season-release-hop/

For the first card, I did not use foam tape to mount the die-cut, but I did for the second card. I liked it better with the mounting tape so I used it on the rest. I went back to the first card and added a second layer to the die-cut. That was so much easier than cutting up all those pieces of mounting tape. Next time, I’ll double or triple the layers of die-cut.

When you have a card as simple as this, it’s so important to have everything straight. There isn’t anything to divert the eye from our mistakes. When mounting the front to the card base, I didn’t get it straight. I remembered a tip I saw in a video so after tearing the card base off and making a new one, I put Connect Glue over the mounting tape so I could move it around a bit after placing it on the card base. That worked well.

CARD:
4 ¼” x 5 ½”
Neenah Classic Crest Solar White 110-lb. cardstock
Distress Oxide Inks (Twisted Citron & Lucky Clover; Cracked Pistachio & Broken China with a touch of Twisted Citron)
Clarity Brushes (to apply ink)
My Favorite Things Hand Lettered Holiday Stamp Set
Versafine Onyx Black ink pad
Ranger Clear Super-fine embossing powder
3-M Mounting Tape (to attach inked background to card base)
Swarovski Flatback Rhinestones, Crystal, SS12, SS16, SS20
Ranger Matte Accents (to attach the gems)

FOCAL IMAGE:
Simon Says Stamp Peyton Ornament
DCWV Glitzy Glitter Cardstock Stack
3-M Mounting Tape (to attach die-cut)
Gina K. Connect Glue
Zig 2-Way Glue ( layer die-cuts)


Comment 1 to 8 of 8
Page: 1

Iring   [Dec 08, 2018 at 03:10 PM]
This is so, so pretty! I love your soft ink blending. The crystals make it extra special. Thanks for the tips you shared.
howdyheidi   [Dec 08, 2018 at 06:37 PM]
A really lovely card! Such a pretty die cut in the glitter paper, and your sponging looks so smooth. I am sorry you don’t like the connect glue. I hear so many people rave about it but it seemed a touch too expensive to me.
Nora S   [Dec 09, 2018 at 12:38 AM]
Daria, this is very elegant. I love the softness and simplicity of this beautiful card! Everything is just perfect! TFS
Canadian, eh   [Dec 10, 2018 at 06:52 AM]
Wow, you went through a lot of work. Such a perfect placement of your ornament and sentiment. It sounded like it was a delicate card to put together. The blue and green are blended so beautifully. Job well done!
Conniecrafter   [Dec 10, 2018 at 09:46 AM]
Oh my that is beautiful, I do love how your background turned out and I do like that tip for mounting tape, so you have a little play room. Wow that is a bummer about the glue being so hard to get out, I may not bother with giving it a try.
stampwilly   [Dec 10, 2018 at 10:38 AM]
This is beautiful! I love your blending. I love everything about your card! Very Happy
djc   [Dec 10, 2018 at 12:51 PM]
Correction: I did not use the Zig pens on the mounting tape. Zig dries really fast and would not allow wiggle room. I switiched to the Zig pens when I layered the die-cut on the one die cut I did not attach with mounting tape. I edited the original post. Daria
djc   [Dec 12, 2018 at 06:47 PM]
Heidi, I liked the glue, just not the container. It turns out that it is defective, and they are sending me another one. Daria

ETA: The new container works great!

Comment 1 to 8 of 8
Page: 1

Add your comment
Anonymous comments are not allowed here. Log in to post your comment